Pages

Subscribe:
Showing posts with label Burlington High School Student Help Desk. Show all posts

Thursday, 11 December 2014

Day 66 - I Am Not A Barbie Girl - BHS Senior Kristin Johnson

This post first appeared on Kristin's Help Desk Blog
Almost every little girl growing up was given a Barbie doll, whether it was a princess, an everyday, or a career doll,  society has influenced girls to strive to fit the model of a Barbie Doll. On November 14, Buzzfeed, a blog covering current topics in entertainment, technology, and “life” in general, released an article on a book published by Mattel called “Barbie: I can be a computer engineer”.  Thinking this book would be written in order to encourage young girls to become interested in a technology field, I was very disappointed to find that Barbie had no insight on what to do. The book starts out with Barbie and her sister Skipper sitting in the kitchen. Barbie is furiously typing away creating a game that allows a user to use a cute little robotic puppy to complete tasks. First of all, Barbie had to create a game that had a puppy in it because if it was anything else, it would not be girly. Secondly, Barbie is not actually writing the program that will make the game run, she is simply designing it, she will “need Steven and Brian’s help to turn it into a real game!” Upon showing Skipper the game, a virus appears crashing Barbie’s computer. But have no fear, Barbie has her flash drive on her necklace because she has to accessorize. Barbie goes to plug-in the flash drive to Skipper’s computer, transferring the virus to that computer as well. If Barbie knew anything about computers, she’d know that when she plugged in the flash drive to her computer , it would transfer onto the flash drive.
Skipper’s computer then crashes and she looses her work. Barbie promises that she will get both computers fixed when she goes to school. But before Barbie left, Skipper hits Barbie with a pillow, starting a pillow fight. Stereotype much? Having a pillow fight is clearly the right move in this situation. Barbie tells Skipper that she’ll bring their laptops to school so that she can fix them. Barbie is sitting after class and her two friends, who happen to be males, begin talking to her. Barbie explains her situation prompting Stephan to reply with “It will go faster if Brian and I help”. The amount of sexism behind that reply is unbearable. Barbie, as a woman, clearly can not fix the laptops herself.
The moment that Barbie hands over the laptops, Brian and Stephan instantly fix them as if it was as simple as pressing a key. Boys to the rescue!The following morning Barbie gives her sister her laptop and believes that it was her that fixed both laptops and not the boys. Following the return of the Skipper’s laptop, Barbie presents her cute puppy program to her teacher, who just so happens to be a woman. Barbie’s teacher is blown away by her work and gives her an A+ and even extra credit. Congrats Barbie, you’re clearly a computer engineer. Couldn’t write a program or fix two laptops but you drew a cute puppy and wore a cute top when you presented the game. So sure Barbie, you can be a “computer engineer”.
This coming January, I will have the honor to attend one of the most prestigious education conferences in the country. Along with my three other female classmates and my teacher we will be attending Educon in Philadelphia. Our conversation will be: Closing the Gender Gap in Innovation: Engaging Girls in STEM.
This is an amazing opportunity. Not only will it benefit me because it shows I am passionate about pursuing a technology related career, but I hope to inspire other girls to get involved in technology. There are not enough women in the field of technology. It is male dominated and in the 21st century it should not be that way.
As a girl in the technology field, I do realize that it is not always the easiest thing to be a part of. But that did not stop me. Over the past four years I have taken programming classes, been apart of the Burlington High School’s Help Desk, attended various technology conferences and even got the opportunity to tour the Google office located in Cambridge. Being a girl does not mean that I have to be just a house wife, I can be whatever I want. To all you girls out there that are interested in the technology field, do not be afraid to pursue your dream. Just because Barbie is not a computer engineer does not mean you can’t.

Monday, 1 December 2014

Day 59 - A Tour of the BHS 1:1 Program - Nikhil Thakkar - BHS Senior

Last week, I was afforded the opportunity of perusing through Burlington High School’s main office hallways, through the art and photography studio, into the heart of BHS math with Mr. Khan’s AP calculus class. The BHS Help Desk shirt, customized for each individual tour guide, was merely the beginning of an imaginatively free session of “touring,” a time when I was able to show teachers, administrators, and parents from around the world how BHS has implemented technology into its classrooms. 
I, as a tour guide played the role of the messenger, answering questions and giving a general rundown about how an iPad may be helpful in “navigating a simulated cell,” throughout a biology class, or reading “ebooks” for an English class, ultimately making highlighting and note taking more accessible and effective. We even learned how Mr. Khan uses Notability and different calculator applications for different functions in his math classes. Although I gave the tour myself, it was not simply I who was talking. Quite the opposite, no one was “talking,” because the tour was much better described as a “conversation” between administrators and tour guide, as I aimed to engage administrators with the tour rather than lecture at them. 
A few prime examples of questions included: How do students use their study period? How are iPads used in foreign language classrooms? Is Burlington a BYOD school? I’d like to address each of these questions in their respective order, the first of which lends itself to explaining the truly open-minded, innovative ideology behind constructing the Burlington curriculum. 
Walking into the library, administrators witnessed a Google-like “lounge” area, where students seemed to be heavily focused on their iPads. I won’t deny that students play games (in class and out of class), but I will argue that students have learned individual responsibility not only for their lives but for their education; the underlying principle is that distractions, by definition, will always exist. However, it’s the idea that we need to learn how to effectively deal with these distractions that Burlington advocates for. Thus, throughout daily 45-minute periods, students are not only working, but they are also taking charge of their education and learning invaluable life skills, the most conspicuous being time management. 
The second question is one of my favorites, as I am a prospective linguistics major (yes, yes I know linguistics isn’t the same as languages). iPads are used heavily within foreign language classrooms as they allow for intensive involvement with reading, writing, speaking, and listening (especially the latter two). We were able to witness first-hand Señora DeSousa’s Spanish classroom using the iPad for a listening exercise. Personally, I find the iPad’s extremely effective and useful, as they launch students into the real world (as they listen to real interviews and read real newspapers). 
Lastly, BHS is not officially a BYOD school, however this doesn’t stop students from bringing their own Mac’s (and yes even Windows at times) per their own convenience. Burlington doesn’t restrict. It only opens doors. Ultimately, like in any school, it’s up to the student to take those opportunities or not (and see whether those opportunities resonate with them).  Being in the spotlight was…well…empowering. I experienced profound joy in knowing I have the power to advocate for and perpetuate Burlington’s ideology of intellectual freedom. As an avid public speaker, I had the most trouble with reigning my thoughts in at the end of the hour long tour as I had so much to say and so little time to say it. Nevertheless, this experience proved extremely invaluable and I sincerely hope to showcase Burlington and all of its talent to even more administrators in the future.
Best regards,
Nikhil

Wednesday, 12 November 2014

Day 48 - Why is App Smashing Efficient and Easy? - Sarah Costa, BHS Freshman

This post originally appeared on Sarah's Blog
In our high school digital literacy class,this past week we have worked with many different apps, trying to make them work together to create awesome work. We used Chatter Pix and FaceQ to begin making our Digital Literacy PSA (Public Service Announcement).


photo
Made By FaceQ

FaceQ/ Chatter Pix- Make Your Avatars Come to Life!
First, we used FaceQ to make an avatar that represents our own physical appearance, then used Chatter Pix to make it look as if our avatar was talking and saying our line for the PSA. Personally, I thought Chatter Pix was very cool and creative, and it was very easy to use. I thought that FaceQ was super fun to use because there were so many options and I enjoyed being able to play around with the different features. Also, it was very effective because when I was finished, I ended up with a cute picture that resembled my appearance very well. According to ‘The Gamer with Kids,’ , FaceQ is more involved and shows individuality, rather than the common emojis.
Aurasma/ Pic Stich- Make Your Pictures Interactive and Fun!
Aurasma is also a very cool and involved app to use for educational purposes. I think even though it is very easy to use effectively, it is a more advanced app based on what it can do. If you have an Aurasma account, you can scan any picture that is in the account, and from that motionless picture, pops up a video that will explain the picture or has to do with it. I think Aurasma is very interactive because it actually requires you to scan a picture with a device, rather than just clicking a button. Overall, I enjoyed this app and I hope to use it more in the future for other projects. Pic Stich was also very easy to use and it worked, just like we needed it too. We only had to put a picture of ourself on one side, while there was a picture of our avatar on the other side, and it cause us no problems. By using Pic Stich, we had our photo collage in a matter of seconds.
Google Apps- Share Your Ideas!photo-2
We used Google Drive and Google slides to being everything together, and make the finishing touches on the final PSA project. The Google apps were very efficient because they let everybody see their classmates work so that they would a ll look the same they would look very professional and finished. Lastly, we used Google classroom to export everything to our teacher and share all of our final ideas with each other. Overall, app smashing was effective, and helped us understand how to do things easier, and efficiently. Check out edtechteacher’s website to see how people do things similar with a variety of apps!

Thursday, 5 June 2014

Day 168 - If You Like Socrative, You’ll LOVE Kahoot - Nathan Rippin, BHS Junior

This post originally appeared on the BHS Student Help Desk Blog

With summer vacation just a few weeks away it can be easy for students to become distracted, but teachers are still focused on preparing students for final exams. Many teachers look for ways to make review sessions fun and engaging and use tools such as Socrative. As an alternative, teachers can try the free, web-based, device agnostic classroom response system Kahoot.
Kahoot allows teachers to create quizzes, discussion questions and surveys. From a student point of view, I’d much rather play a game of Kahoot against my classmates versus complete a review worksheet. And if asked to compare the two, I think Kahoot blows Socrative out of the water. I found it to be intuitive, more like a game show and very exciting.
Getting Started with Kahoot
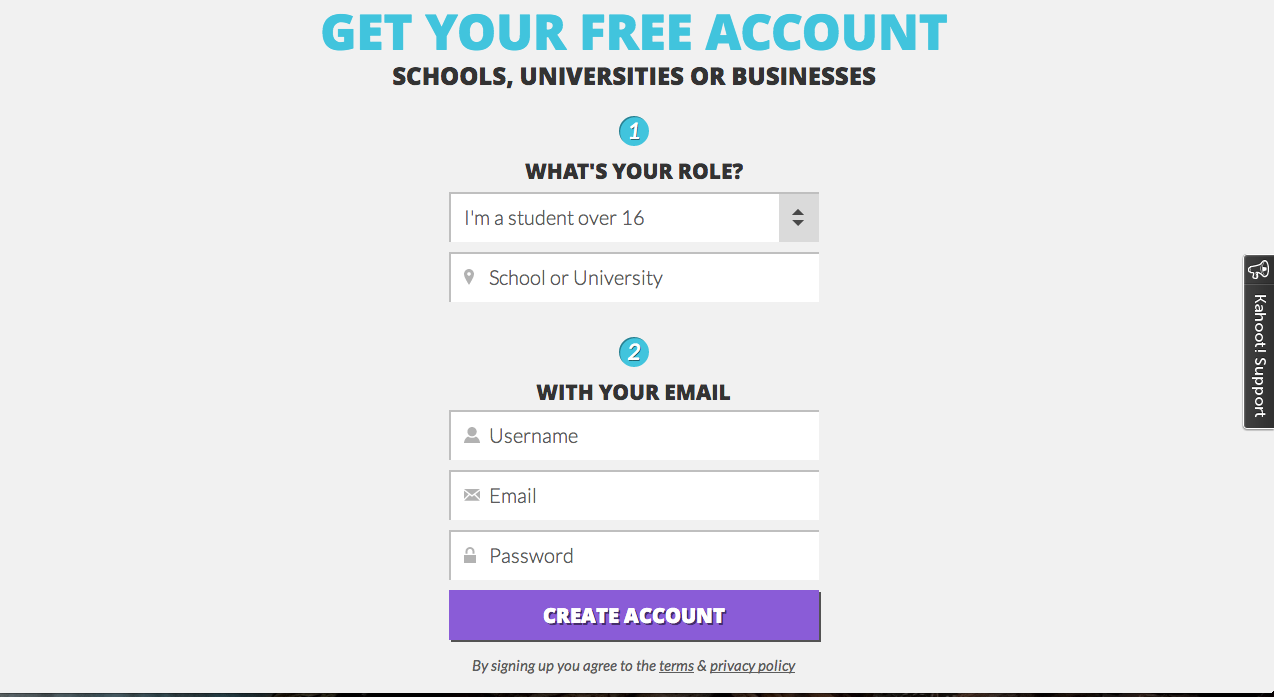
Teachers create a free account by selecting their role (teacher) and entering the name of their school. Next, teachers provide their email, select a username and password and click “create account.”

Create an Account. All you need is a Username, Email, and Password
Teachers can create quizzes, discussions, and surveys
Creating Kahoot Quizzes 
Creating a quiz in Kahoot is a simple process. Teachers select “quiz,” give their quiz a title and start building questions and answers. Questions are limited to 95 characters and responses are limited to 60 characters. Teachers simply click on the correct response and that answer will get marked as correct and turns green, while the remaining responses will be marked incorrect and are red. Once the quiz has been created, teachers are taken to a screen where they can easily rearrange the order of the questions. Next, teachers select the settings for their quiz. Teachers select which language they want for the quiz (there are 24 languages to choose from), whether it is public or private, and the primary audience (school, university, business, training, event, or social). Teachers can also describe the quiz, use tags, and set the difficulty level to either beginner, intermediate, or advanced. Finally, teachers can select a cover image for their quiz. One of the experimental features that’s in beta is embedding a YouTube video to be displayed in the background of the “lobby screen” as players join the game. Once teachers have selected all of their settings, they select “done” and are ready to share their quiz. Kahoots can be shared with students via social media through Facebook, Twitter, Pinterest, Google+, or email. Teachers can also select “play now” and students will be able to start playing the game right away. Teachers have several options for game play including randomizing the order of answers and playing music in the lobby while players are joining the game. There are also several advanced options including showing players the details of your wifi network.
Teachers can share their quizzes with students through social networks
Screen Shot 2014-06-02 at 8.44.09 AMScreen Shot 2014-06-02 at 8.43.51 AM
Creating Kahoot Surveys & Discussions:
Teachers can create surveys with an unlimited number of questions to gain valuable feedback from their students and gage knowledge of a subject or view on a certain topic. Likewise, teachers can use Kahoot to facilitate a discussion or start a classroom debate. The process for creating surveys and discussions is almost identical to creating a quiz.
Create a survey to gather opinions and date from students
Create a discussion question to spark a classroom debate
Kahoot From the Student Perspective
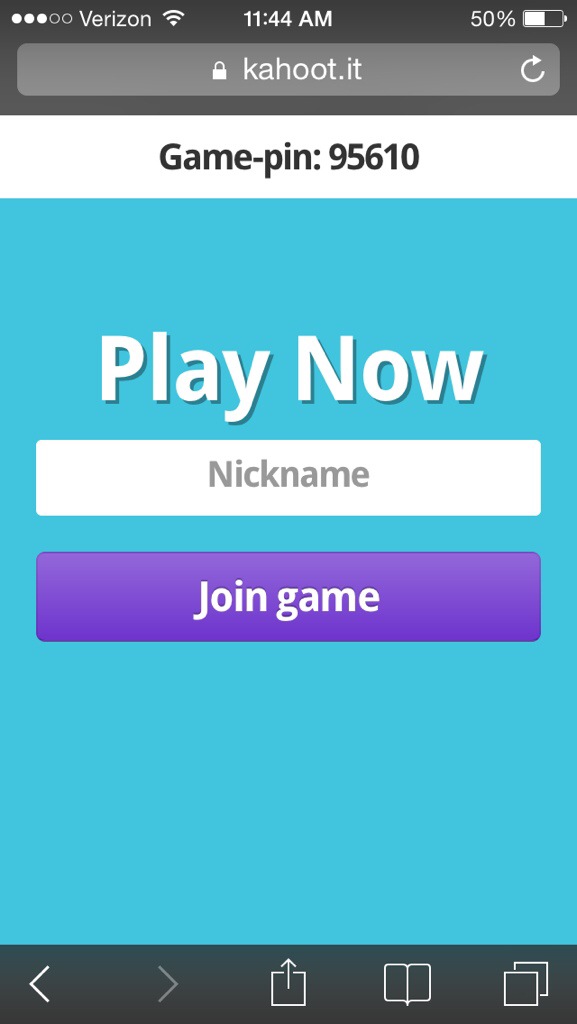
To play a Kahoot game, students will go to the website Kahoot.it and enter the pin number to join the game. It takes less than two minutes for students to join a game of Kahoot. Students can play from their iPads, Chromebooks, iPhones, or Android devices. This is the login screen that students will be directed to play the game.
20140528-115116-42676661.jpgThe student will be prompted to enter a room number code (show in the screenshot below).
20140528-115116-42676781.jpg
Once students have entered the teachers room, the game prompts students to select a nickname. This can be anything they choose. Next, they’ll be ready to join the game and start playing.
20140528-115116-42676892.jpg
Once students are logged in, the teacher will see the names of the students as they join the game.
Screen Shot 2014-05-28 at 11.44.44 AM
Once students have joined the game, they select their answers by matching to the color and shape of the  questions on the board.
20140528-115117-42677002.jpg
Teachers can also embed images into their questions. Below is an example of a question that was created using an image. Kahoot is also experimenting with allowing teachers to embed videos.
Screen Shot 2014-05-28 at 11.45.03 AM
Once students select their answer, feedback is almost immediate. Students receive scores based upon their answers and time to respond. The rankings are adjusted accordingly. Teachers can set time limits on the responses to questions; either 5, 10, 20 30, 60, 90 or 120 seconds. The harder the question, the more time a teacher may want to give her students to respond. Time limits can also create a competitive atmosphere that will get students excited to respond quickly. Screen Shot 2014-05-28 at 11.45.14 AM
20140528-115117-42677112.jpg
Viewing Public Kahoots
Kahoot is a space where teachers can share and see what their colleagues are doing all over the world. From kindergarten to a advance level college class, Kahoot has publicly shared projects that will fit into any curriculum. According to Mrs. Scheffer, Kahoot might also be a way to spice up a department or faculty meeting.
Final Review
Overall, Kahoot is an awesome new way to bring fun and (educational) games into the classroom. I believe that it is the future of studying and classroom engagement. And if you still want students to review for your final or another major exam using a worksheet, you can send it to them via Google Drive. Students can complete a traditional review worksheet independently at home and send it back to their teacher via a Google Assignment Turn-in Form. If you need any help setting up your first Kahoot quiz, survey, or discussion, Help Desk students are available to assist you. You can also contact Mrs. Scheffer to schedule a time to meet with her to get started with Kahoot.

See For Yourself
To see how simple it is to set-up and play a Kahoot game, you can watch a three minute tutorial by clicking here.
Enhanced by Zemanta

Monday, 19 May 2014

Day 156 - Streamline Workflow Using Google Forms - John Vallerand, BHS Senior

FormsIcon1One of the most powerful and versatile applications in the Google Drive suite is Google Forms. Forms is the ideal way to create surveys and is perfect for submitting assignments to teachers. Forms can also be used by coaches and club advisors to organize and manage information about their players or members. As part of the Help Desk course, we use Google Forms to submit all of our assigned work. Our instructor, Mrs. Scheffer, created a form for all of us in the Help Desk program. The form, titled “Help Desk Assignment Turn-In,” was shared with us and we access it through Drive on our iPads or on a computer.
Screen Shot 2014-05-14 at 10.39.38 AM
 Using Google Forms to Streamline Workflow
Using Google Forms is convenient for both me as a student and for my teacher. After every assignment I complete, I submit my work by copying and pasting the URL of the file into the form. Mrs. Scheffer then opens the spreadsheet linked to the form and has access to not only my files, but all of my classmates files in one convenient location. All of our folders have been shared with her and she has editing rights. But rather than access our work through clicking multiple folders, she can click on one link in the spreadsheet. We have found this workflow to be the easiest and most streamlined method to submit and access work and it allows us to be paperless. Mrs. Scheffer uses the comment feature in Docs and gives us feedback on our assignments. We then edit our documents based on this feedback and submit for a final grade. We recently went through this entire process when we completed our career portfolio projects. Mrs. Scheffer is the only teacher I have who is using this workflow, but I think it’s one that other teachers should consider and see how they like it. Forms can be made private so that the teacher has full control over who can submit responses. The timestamp can be controlled by teachers which is hugely important because it prevents changes to the date and time of submitting work.
 Creating a Form
Creating a Form is a simple process. First, you choose a theme and give your Form a title. As you can see from the screenshot below, there are themes students could use for both academic and personal reasons. For example, if I was throwing a graduation party (June 8th is right around the corner!) I would use the balloon theme.
Screen Shot 2014-05-15 at 9.08.28 AM
Adding Questions
The next step is to add questions. There are nine different types of questions you can choose from including multiple choice, text, and check boxes. You also have the option to determine if each question is required.
Screen Shot 2014-05-15 at 9.08.47 AM
Once your form is complete, you’ll want to choose the confirmation page settings before sending the form to recipients.
Screen Shot 2014-05-15 at 1.31.53 PMSending and Sharing a Form
There are several options to choose from when sending and sharing a form including email, Google+, Facebook, and Twitter. Forms can also be embedded into blogs, websites, and emails. Just like with Google Docs, Forms can be shared with others for collaboration purposes and these additional users have editing rights.
Screen Shot 2014-05-16 at 8.08.23 AM Benefits of Google Forms:
  • Add themes
  • Choose a destination for the responses to go
  • You can validate answers
  • You can share your forms
  • Manage responses
  • Allows students to feel more confident that their work is turned in correctly
Looking For More Ideas?
Below are three links to additional ways Google Forms can be used in the classroom. If you wish to give the Form work submission a try and want assistance in creating and embedding the form, please don’t hesitate to come see us in the Help Desk for one on one help.
A Tour of Google Forms

Enhanced by Zemanta

Friday, 9 May 2014

Day 150 - Open Educational Resources for Students and Teachers - Danny Piotti, BHS Junior

One of the advantages and most exciting aspects of 21st century teaching and learning is the influx of free, high-quality online resources for students and teachers. These resources help promote self-directed, lifelong learning and when a student has their own device, as we do here in Burlington, learning can occur anytime and anyplace. At the same time, this can be a disadvantage because it can be difficult to determine which of the thousands of resources out there are the best. In this post, I’ve taken the guess-work out of the process for both students and teachers and will highlight Khan Academy, CK-12, and Open Educational Resources.
Khan Academy: A Student Perspective
Khan Academy is a top educational application that provides students with free eUnknowneducational lessons on a wide variety of subjects. There are currently thousands of Khan Academy educational videos  via the organization’s YouTube Channel as well as practice problems and quizzes available to students. Khan Academy offers resources in: math, science, economics and finance, humanities, test prep, partner content, computer programming, talks and interviews, and coach and classroom resources. All of the categories are also loaded with subcategories for more specific courses. Within each subcategory there are lectures, problems and explanations for virtually anything you may need help with.
My Khan Academy Experience
I have used Khan Academy in the past for situations when I missed a lecture and wanted to catch up. Because of the resources provided by this open education resource, my grades have never suffered. My favorite feature about the iPad appis the SAT prep section. What’s awesome about the SAT prep is that it provides a free, full length SAT test and also contains explanations for any type of math problem found on the SAT. Another cool feature about Khan Academy is that you don’t have to have an internet connection if you download the videos onto your iPad beforehand. Khan Academy also remembers the videos you have previously watched if you have an account which is helpful because it saves you time from searching twice. Overall, I have never had a bad experience on Khan Academy and I have found it to be a very reliable source.
CK-12 & OER: A Teacher Perspective: 
CK-12 competes head to head with Khan Academy in terms of quality and quantity. Itck12 is more math and science based, but it also contains other subjects such as English. There is also an SAT prep section similar to Khan Academy. Under the math and science sections there are many sub-categories containing many different courses. After clicking on a specific subject you will find yourself overwhelmed with pretty much any topic covered in that subject. After clicking on a topic you will find readings, videos, activities, and assessments. There is also a section that contains content that other teachers can add which is nice, but I recommend using these after going through everything else.
Screen Shot 2014-04-16 at 10.59.15 AMOER Commons allows teachers to browse educational resources by content type, subject area and grade level. Resources include activities and labs, case studies, games, assessments, audio lectures, full courses, and more. Teachers can not only use OER resources, they can create and share OER resources using the OER Open Author tool. This tools provides teachers with the freedom to build their own course content by combining text, pictures, sound, files and video. Materials, including all media, can be download as PDFs. Teachers can also join OER groups based on content area and grade level. 
Looking for more? 
64951_10150841784299129_1110355367_nIf you are still looking for more learning resources, please visit Open Culture. Open Culture is an online database composed of resources including audio books, online courses, movies, languages, k-12 resources, and eBooks. The site also offers certificate courses and MOOCs. This is a very rich database that can be a very helpful to students and teachers alike.


Friday, 2 May 2014

Day 145 - Google Launches Dedicated Docs & Sheets Apps (Slides Coming Soon) - Jenn Scheffer, BHS Instructional Technology Specialist

Google Docs
Google Docs (Photo credit: Kinologik)
Yesterday, Google introduced Docs and Sheets as standalone apps for it’s Drive productivity suite for iOS. Google Slides are reported to be coming soon. Here are some of the early reviews from the app store:
“Not very good”
“Still lacking major features”
“Still no way to edit tables or images”
“OK but not anything groundbreaking”
“Still no spell check”
“Waste of time” 
Two reviews that students and teachers may want to pay close attention to are:
“Great, but where’re my folders?” This review went on to say, “That said, having used Docs for years now, I have my own filing system to sort through my hundreds of docs. After opening this app, rather than seeing my own system, I saw all of my docs lain out by their most recent time of access, rendering the app functionally useless. So, it’d be great to see more Drive and folder integration.”
An educator’s review stated:
“Only shows 3 documents in my Google Drive (out of approx. 500). I am a teacher and I collaborate with colleagues using Google Drive. I have over 200 documents on my personal My Drive and several other hundreds that have been shared with me that I’ve also put in My Drive. The app only shows 3 documents with no ability to see the others! It’s useless until this is fixed!”
What the students think
Several Help Desk students have already installed the new Docs and Sheets app and all of their Drive files appeared, however there were no folders. Students then went back into the Drive app to start a new Doc. They were pushed out of the Drive app and the Doc app automatically opened. Students did not seemed to be phased very much by the changes to Drive. They equated it to when Facebook launched a stand alone messaging app. That being said, they did express confusion as to why Google is making this change, especially when the functionality does not appear to be increasing. When one my students opened the app he stated, “this is pointless.” Students are predicting Google will roll out additional features and increased functionality.
What the teachers think
Similar to the user whose review is mentioned above, I have developed my own system of file management. Obviously using folders was a big part of that system, as was having the ability to edit files in Drive. While I still haven’t had much time to explore with the Docs apps, I am not thrilled about this move. Neither is Dennis Villano, the Burlington Public Schools Director of Instructional Technology. After discovering the change, Dennis Tweeted, “I’m very disappointed with (the) Google Drive app update requiring use of two new apps and elimination of editing in Drive.” Dennis went on to say, “I think it’s a bad idea-especially in the education world-requiring more apps is not the right way to go.”  This is especially true since at the current time there is very little increased functionality in the standalone apps.
Offline and mobile
The only new feature the Docs app seems to be offering at this time, and heavily promoting, is providing automatic offline access to your files. Now users can create, view, and edit files without an internet connection. Beyond that, there’s not much to the “new” Docs app. CNET’s review states Google has introduced more of a philosophical change, versus a real update. Other critics speculate that the move is Google’s attempt to compete with Microsoft and iWork. According to Google’s official blog, the vision is for Drive to serve as a storage area, with the standalone apps being used to create and edit specific files. In all fairness to Google, we do realize this is a 1.0 version release. The version 1.0 release of Drive wasn’t all that impressive either. I guess we’ll just have to wait and see what comes next…
 Enhanced by Zemanta

Wednesday, 16 April 2014

Day 139 - Setting Up A Signature In Google Drive - John Vallerand, BHS Senior

This post originally appeared on the Burlington High School Help Desk Blog

As part of Tuesday’s tech tip I have put together a Google Drive signature tutorial. This tutorial covers the step by step process of how to set up a signature in your mail account. The advantages of having an automatic signature in Gmail are:
  • Allows you to look professional
  • Gives people a better feel for who you are
  • You can link your blog address in the signature
  • You can link your Twitter
  • Avoid having to type a closing at the end of every email
Students who will be graduating soon should seriously consider adding a professional signature to their Gmail account. When students are in college and are communicating with their professors and/or potential employers, it conveys a highly professional image.

Enhanced by Zemanta

Thursday, 10 April 2014

Day 136 - Welcome to Burlington High School - Jennifer Scheffer, BHS Instructional Technology Specialist

This post originally appeared on the BHS Help Desk Blog 

The Burlington High School Help Desk is very excited to have educators from all across the country visit our school as a part of this year’s New England 1:1 Summit. Guests will have the opportunity to observe our 1:1 teaching and learning environment while school is in session. There will be approximately 100 visitors joining us tomorrow to learn about our 1:1 program. Visitors will have the chance to see the unique and innovative ways our teachers are integrating the iPad into their curriculum and learn about the structure of the BHS Help Desk program. We look forward to meeting educators from across the country and sharing our experiences with them.
Tomorrow’s visitors will see that at BHS, a major reason why our 1:1 program has been so successful is because of our teachers and their commitment to providing students with relevant learning experiences. Members of the Help Desk staff recently authored posts on their personal blogs which offer a glimpse of what it’s like to be a student learning in a 1:1 classroom. Find out from Junior Danny Piotti how Mr. Todd Whitten uses technology in AP World History, discover how senior Amit Patel was enlightened during his junior year when he took Mr. Chuck Wood’s AP Biology class and learn how Mrs. Joyce Carey engages her students through the effective use of technology. Tomorrow’s guests will see many more inspiring examples of what teaching with technology looks like and the impact it can have on students.
photo 1 (4)
photo 2 (2)
photo 3 (1)

Friday, 28 March 2014

Day 127 - Practical Application of 3D Printing - Harsh Dedhiya, BHS Senior

This post originally appeared on the BHS Help Desk Blog
cardholder.jpg
This week we worked on creating a 3D model for a card holder as a follow up for the 3D printing post that we published earlier. We already have a generic plain card holder in the Help Desk room, but we wanted to spice things up and make a custom Help Desk one. I imported a base for a 3D card holder from Thingiverse into Sketchup. Sketchup is a simple 3D modeling tool by Trimble. For Amit and I, it was not so simple in the beginning. In order to import models from Thingiverse into Sketchup, we had to download and install an STL plugin. Next, we had no prior experience to modeling in a 3D environment. We constantly had to look up tutorials on how to work with Sketchup, especially with moving the camera around. At first we planned to have a pen holder attached to the card holder, but we later decided to scrap it and stick to the simple card holder only. From the base model of the card holder, we overlaid 3D text onto the front panel of the model. Then we scaled the sides of the model to fit the dimensions of our business cards. What we decided to make is not that advanced, but we hope to start with the basics and then create more intricate objects in the future.
Step 1: Download base modelScreen Shot 2014-03-18 at 9.50.35 AM.png
Step 2: Open in SketchupScreen Shot 2014-03-14 at 8.06.59 AM.png
Step 3: Add text
Screen Shot 2014-03-14 at 7.54.23 AM.png
Step 4: Scale Model
Screen Shot 2014-03-18 at 9.52.55 AM.png
Step 5: Print!
The time it takes for a 3D object to print depends on the size and intricacies of the design. Our card hold took four hours. The video clip below show the printing process in action.


3D printing doesn’t just stop with card holders. The possibilities are endless. The value in learning how to create 3D models to print is priceless. After all, education is all about what you learn to create. Sketchup, as a tool, is immensely powerful, and can enable one to customize or create anything one desires. Our high school robotics team actually 3D printed some of their parts for competition, and they managed to withstand the onslaught of defense during three days of competition. Functional and durable, 3D printed objects were also on display in the lower library at times during the week. Using apps like123D Creature, students were able to create some wacky models. The creations were on display at the recent art show and were among the highlights. Even the printing itself drew a crowd, as during passing periods, the MakerBot was always sure to grab a couple of curious minds. While 3D printing may not currently be accessible to all at the moment, it’s inevitably on its way to becoming mainstream, and it already is at our high school! Have more questions about 3D printing? Check outthis guide by 3D Genius: The Home of 3D Printing.

Enhanced by Zemanta